Battery switch on travel trailer function is crucial for managing your RV’s power. Understanding how these switches work—whether it’s a simple 1-2-both or a more complex setup—is key to preventing electrical issues and maximizing your battery life. This guide dives into the various types of switches, their operation, troubleshooting tips, and even installation advice, equipping you to confidently handle your travel trailer’s electrical system.
We’ll cover everything from identifying your switch type to diagnosing problems using a multimeter, ensuring you can keep your lights on and appliances running smoothly. We’ll also explore how your battery switch interacts with other parts of your RV’s electrical system, like your solar panels and converter, for a holistic understanding of your power management.
Types of Battery Switches in Travel Trailers: Battery Switch On Travel Trailer Function

Choosing the right battery switch for your travel trailer is crucial for managing your power sources efficiently and safely. Understanding the different types available will help you make an informed decision, whether you’re installing a new system or troubleshooting an existing one. This section will explore the common types, their pros and cons, and how to identify them in your RV.
Battery Switch Types and Their Characteristics
Travel trailers typically utilize one of several battery switch configurations to control the flow of power from your house batteries (often 12V) and potentially a starting battery (also usually 12V). These switches allow you to isolate batteries for charging, prevent accidental draining, and selectively power different systems.
- 1-2-Both Switch: This is the most common type. Position “1” connects only the first battery (often the house battery) to the trailer’s electrical system. Position “2” connects only the second battery (often the starting battery for the tow vehicle) to the system. Position “Both” connects both batteries in parallel. This allows for greater power output but also means both batteries discharge together.
- 1-2-Off Switch: Similar to the 1-2-Both switch, but it adds an “Off” position that completely disconnects both batteries from the trailer’s electrical system. This is particularly useful for long-term storage to prevent parasitic drain.
- Single Battery Switch: This simple switch only connects or disconnects a single battery to the system. This is less common in travel trailers that typically utilize dual battery systems for greater power capacity, but it might be found in smaller trailers or for specific auxiliary battery setups.
- Rotary Switches: These offer a more compact design and can control multiple circuits or batteries. More complex configurations may offer several positions beyond just 1, 2, and both/off. They are often used in more advanced or custom installations.
Advantages and Disadvantages of Different Switch Types
The best switch type depends on your specific needs and setup.
| Switch Type | Advantages | Disadvantages |
|---|---|---|
| 1-2-Both | Simple operation, good for most applications. | No off position for complete isolation; both batteries discharge together. |
| 1-2-Off | Complete battery isolation for storage; separate battery control. | Slightly more complex operation than 1-2-Both. |
| Single Battery | Simple and inexpensive. | Limited functionality; only suitable for single battery systems. |
| Rotary | Compact, can control multiple circuits/batteries. | Can be more complex to understand and operate; higher initial cost. |
Identifying Your Battery Switch
Locating and identifying your battery switch is the first step. It’s usually found near the batteries themselves, often in a dedicated battery compartment or under a storage compartment near the tongue of the trailer.
- Visual Inspection: Carefully examine the switch itself. The markings (1, 2, Both, Off) will clearly indicate the type. Take note of the number of terminals connected to the switch; this will help you determine the number of batteries it manages.
- Wiring Diagram: Consult your trailer’s wiring diagram. This should show the switch’s location and how it’s connected to the batteries and electrical system. The diagram may also indicate the switch type.
- Tracing the Wires: If you can’t find a diagram, carefully trace the wires from the batteries to the switch. The wire connections will provide clues about the switch’s configuration and the number of batteries it controls.
Wiring Diagrams for Common Switch Configurations
A detailed description of wiring diagrams would require visual aids which are outside the scope of this text-based response. However, a simple understanding is that the 1-2-Both switch involves three positions controlled by a rotating selector, each connecting different battery combinations to the load (trailer systems). The 1-2-Off switch adds an extra position to completely break the circuit, isolating all batteries.
Single battery switches have only an on/off position, while rotary switches can have multiple positions and control several circuits or batteries.
Battery Switch Functionality and Operation
A battery switch is the central control point for your travel trailer’s electrical system, allowing you to manage power flow from your batteries to the various appliances and systems within your RV. Understanding how it works is crucial for safe and efficient operation.The battery switch acts as a gatekeeper, selectively directing power from either the house battery (powering interior lights, appliances, etc.) or the chassis battery (powering engine starting and other vehicle-related systems), or both, to the trailer’s electrical system.
This control prevents accidental draining of one battery by the other, and allows you to disconnect power entirely when the trailer is stored. Different types of switches offer varying degrees of control and flexibility.
Power Flow Control
The primary function of a battery switch is to route power from the batteries to the trailer’s electrical system. A simple on/off switch connects or disconnects all batteries from the system. More advanced switches allow for selection between house and chassis batteries, or even the ability to combine both for increased power output. In a typical setup, the switch sits between the batteries and the trailer’s main electrical panel.
When the switch is in the “on” position, power flows freely from the selected battery(ies) to the panel, powering your lights, appliances, and other devices. Turning the switch to “off” completely isolates the batteries, preventing any power drain.
Managing House and Chassis Batteries
Many travel trailers utilize both house and chassis batteries. The house battery provides power for the living space, while the chassis battery powers the engine starting system. A properly functioning battery switch allows you to manage these separately, ensuring you don’t accidentally drain your starting battery while parked. This is particularly important for extended stays off-grid. Some switches offer a “both” position, combining the power from both batteries for situations requiring more amperage, such as running an air conditioner.
This arrangement ensures optimal usage and prevents premature battery failure.
So, you’re an audiophile who loves to travel? Awesome! Check out this guide on creating the perfect audiophile travel setup to ensure your ears are always happy on the road. Knowing how to manage power is key, though, especially if you’re hitting the road in an RV. Understanding the battery switch on travel trailer function is crucial for keeping your music playing and your lights on.
Proper battery management means more uninterrupted listening, which is what every audiophile wants, right?
Safety Precautions When Operating a Battery Switch
Always disconnect the negative (-) terminal of the battery before working on any part of the electrical system, including the battery switch itself. This prevents accidental shocks and short circuits. When turning the switch on or off, do so slowly and deliberately. Avoid sudden movements that could damage the switch or create sparks. Regularly inspect the switch and its connections for corrosion or damage.
If you notice any issues, have a qualified technician address them immediately. Never attempt repairs unless you are qualified and comfortable working with electrical systems. Incorrect operation can lead to damaged equipment or personal injury.
Typical Battery Switch Power Flow
A simple flowchart illustrating power flow in a typical dual-battery setup with a three-position switch (Off, House, Both) is shown below. Imagine a box representing the battery switch with three outgoing lines representing the ‘Off’, ‘House’, and ‘Both’ positions. From the ‘Off’ position, no power flows. From the ‘House’ position, a line connects to the house battery, then to the trailer’s electrical panel.
From the ‘Both’ position, lines connect to both the house and chassis batteries, merging before flowing to the trailer’s electrical panel. The electrical panel then distributes power to various circuits within the trailer. This visual representation simplifies the process, demonstrating the control exerted by the battery switch.
Troubleshooting Common Battery Switch Issues
Dealing with a faulty battery switch in your travel trailer can quickly turn a relaxing getaway into a frustrating ordeal. Understanding the common problems and how to troubleshoot them will save you time, money, and a whole lot of aggravation. This section provides a practical guide to diagnosing and fixing typical battery switch issues.
So, you’re an audiophile who loves to travel? Awesome! Check out this guide on audiophile travel setups to ensure your music sounds amazing wherever you go. Knowing how to manage your sound on the road is half the battle, but equally important is powering your adventures. Understanding the battery switch on travel trailer function is crucial for keeping your devices charged and ready to rock, whether you’re boondocking or plugged into shore power.
Proper power management keeps the tunes flowing!
Troubleshooting battery switch problems often involves a combination of visual inspection and the use of a multimeter. A multimeter is an essential tool for any RV owner, allowing you to accurately measure voltage, current, and resistance. Always remember to disconnect the battery before working on any electrical components for safety.
Common Battery Switch Problems and Solutions
The following table summarizes common problems, their likely causes, solutions, and preventative measures. Remember to always consult your travel trailer’s manual for specific instructions and safety precautions.
| Problem | Cause | Solution | Prevention |
|---|---|---|---|
| No power to appliances | Switch is in the OFF position; blown fuse in the switch; faulty switch; corroded battery terminals; disconnected battery cables; dead battery | Verify switch position; check and replace blown fuses; test switch continuity with a multimeter; clean and tighten battery terminals; reconnect battery cables; check battery voltage with a multimeter. | Regularly inspect the switch and fuses; keep battery terminals clean and tight; use a battery disconnect switch when the trailer is not in use; consider a battery maintainer during storage. |
| Intermittent power | Loose wiring connections at the switch; corroded switch contacts; loose or damaged battery cables; failing battery switch | Tighten all wiring connections; clean switch contacts with a contact cleaner; inspect and repair or replace damaged battery cables; replace the battery switch if necessary. | Regularly inspect wiring connections; use dielectric grease on switch contacts to prevent corrosion; avoid over-tightening battery terminals. |
| Blown fuse(s) | Short circuit in the wiring; overloaded circuit; faulty appliance; incorrect fuse rating | Identify and repair the short circuit; reduce the load on the circuit; replace the faulty appliance; ensure the correct fuse rating is used. | Regularly inspect wiring for damage; avoid overloading circuits; use surge protectors; replace fuses with the correct rating. |
| Switch won’t turn | Switch is seized or jammed; corrosion on switch mechanism | Try lubricating the switch mechanism with a penetrating lubricant; if corrosion is present, carefully clean the mechanism. If the problem persists, replace the switch. | Regularly inspect the switch for corrosion and lubricate as needed. |
Battery Switch and Electrical System Integration
Your battery switch isn’t an isolated component; it’s the central nervous system of your travel trailer’s 12V power. Understanding how it interacts with other electrical systems is crucial for safe and efficient operation. This section details the connections and configurations to ensure your trailer’s electrical components work together harmoniously.The battery switch acts as the main on/off control for your house batteries, influencing the power flow to various systems.
Correct integration is paramount to prevent damage to components or short circuits. Improper wiring can lead to system malfunctions or even fire hazards.
Battery Switch Connections to Electrical Components
Connecting the battery switch correctly is vital. The switch typically has several terminals: one for each battery (if you have two), a terminal for the positive (+) side of the house battery bank, and a terminal for the load side that distributes power to other components. The negative (-) battery terminal is usually connected directly to the chassis ground.
Connecting the positive (+) side directly to the switch allows you to isolate the house batteries completely when not in use.The positive load terminal from the battery switch should then connect to the input of your power converter. The converter transforms 12V DC power from your batteries into 120V AC power for your household appliances. Your inverter, if fitted, will also typically draw power from the same positive load terminal.
Finally, solar panel charging systems often connect to the battery bank via a charge controller, which regulates the power flow from the panels to the batteries. A correctly installed solar charge controller will prevent overcharging your batteries.
Wiring Configurations and Their Implications
Several wiring configurations exist, each with different implications on system performance. A simple configuration might involve a direct connection from the battery switch to the converter and inverter. This is suitable for smaller trailers with limited electrical demands. More complex setups, often found in larger trailers, may incorporate a distribution panel or fuse box for better circuit protection and management.
This panel provides a central point for connecting and protecting various circuits.A parallel battery configuration involves connecting two or more batteries in parallel to increase the overall capacity. In this setup, all positive terminals are connected to a single point (often the battery switch), and all negative terminals are connected to the chassis ground. A series configuration, on the other hand, connects batteries in series to increase voltage.
However, this isn’t common in travel trailers, which generally operate on a 12V system.
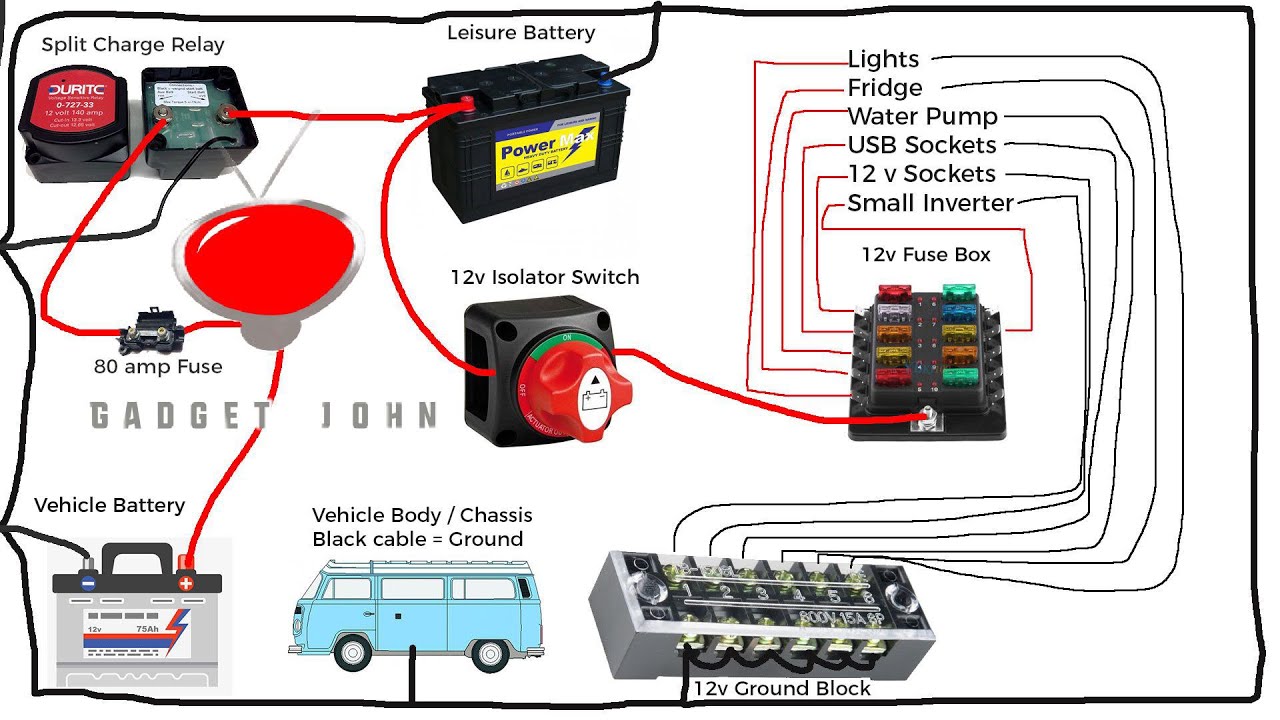
Diagram of Battery Switch Integration, Battery switch on travel trailer function
Imagine a diagram. At the top, you see two house batteries (+ and – terminals each). The positive (+) terminals of both batteries are connected to the “Battery” terminals of a battery switch. The negative (-) terminals of both batteries are directly connected to the trailer’s chassis ground. From the switch’s “Load” terminal, a heavy-gauge wire runs to a fuse block or distribution panel.
From this panel, smaller gauge wires branch out to the power converter, the inverter, and any other 12V devices. Another wire connects the battery switch to the solar charge controller, which then connects to the solar panels. The ground wire from the solar charge controller is also connected to the trailer’s chassis ground. This ensures a complete and safe electrical circuit.
This setup allows for the isolation of the house batteries via the switch, while also providing a central point for managing the power flow to different components.
Mastering your travel trailer’s battery switch isn’t just about turning power on and off; it’s about understanding your RV’s electrical system and preventing costly problems. By understanding the different switch types, their functionality, and common troubleshooting steps, you’ll be better equipped to maintain your RV’s power and enjoy worry-free adventures. Remember regular inspection and maintenance are key to a long-lasting and efficient system!
Question & Answer Hub
What happens if my battery switch is stuck?
A stuck battery switch can prevent power from reaching your appliances. Try gently working the switch back and forth. If it remains stuck, you might need to replace it.
How often should I check my battery switch?
Regularly inspect your battery switch for corrosion, loose connections, and damage. A good rule of thumb is to check it at least once a season or before each trip.
Can I use a battery switch to charge my batteries?
No, the battery switch only controls the flow of power; it doesn’t charge the batteries. You’ll need a separate charging system (shore power, solar, generator) for that.
My trailer’s lights are flickering. Could it be the battery switch?
Flickering lights can indicate a loose connection at the battery switch or elsewhere in the electrical system. Check all connections and ensure they are clean and tight.
